
Stand-Alone Deployment
Stand-Alone Deployment
This guide introduces how to set up a standalone TimechoDB instance, which includes one ConfigNode and one DataNode (commonly referred to as 1C1D).
1. Prerequisites
System configuration: Ensure the system has been configured according to the preparation guidelines.
IP Configuration: It is recommended to use hostnames for IP configuration to prevent issues caused by IP address changes. Set the hostname by editing the
/etc/hostsfile. For example, if the local IP is192.168.1.3and the hostname isiotdb-1, run:echo "192.168.1.3 iotdb-1" >> /etc/hostsUse the hostname for
cn_internal_addressanddn_internal_addressin IoTDB configuration.Unmodifiable Parameters: Some parameters cannot be changed after the first startup. Refer to the Parameter Configuration section.
Installation Path: Ensure the installation path contains no spaces or non-ASCII characters to prevent runtime issues.
- User Permissions: Choose one of the following permissions during installation and deployment:
- Root User (Recommended): This avoids permission-related issues.
- Non-Root User:
- Use the same user for all operations, including starting, activating, and stopping services.
- Avoid using
sudo, which can cause permission conflicts.
- User Permissions: Choose one of the following permissions during installation and deployment:
Monitoring Panel: Deploy a monitoring panel to track key performance metrics. Contact the Timecho team for access and refer to the "Monitoring Board Install and Deploy" guide.
Health Check Tool: Before installation, the health check tool can help inspect the operating environment of IoTDB nodes and obtain detailed inspection results. The usage method of the IoTDB health check tool can be found in:Health Check Tool.
2. Installation Steps
2.1 Pre-installation Check
To ensure the IoTDB Enterprise Edition installation package you obtained is complete and authentic, we recommend performing an SHA512 verification before proceeding with the installation and deployment.
Preparation:
- Obtain the officially released SHA512 checksum: Find the "SHA512 Checksum" corresponding to each version in the Release History document.
Verification Steps (Linux as an Example):
- Open the terminal and navigate to the directory where the installation package is stored (e.g., /data/iotdb):
cd /data/iotdb - Execute the following command to calculate the hash value:
sha512sum timechodb-{version}-bin.zip - The terminal will output a result (the left part is the SHA512 checksum, and the right part is the file name):

- Compare the output result with the official SHA512 checksum. Once confirmed that they match, you can proceed with the installation and deployment operations in accordance with the procedures below.
Notes:
- If the verification results do not match, please contact Timecho Team to re-obtain the installation package.
- If a "file not found" prompt appears during verification, check whether the file path is correct or if the installation package has been fully downloaded.
2.2 Extract Installation Package
Unzip the installation package and navigate to the directory:
unzip  timechodb-{version}-bin.zip
cd  timechodb-{version}-bin
2.3 Parameter Configuration
Memory Configuration
Edit the following files for memory allocation:
- ConfigNode:
conf/confignode-env.sh(or.batfor Windows)
| Parameter | Description | Default | Recommended | Notes |
|---|---|---|---|---|
| MEMORY_SIZE | Total memory allocated for the node | Automatically calculated based on system memory, defaulting to 30% of the system memory. | As needed | Save changes without immediate execution; modifications take effect after service restart. |
- DataNode:
conf/datanode-env.sh(or.batfor Windows)
| Parameter | Description | Default | Recommended | Notes |
|---|---|---|---|---|
| MEMORY_SIZE | Total memory allocated for the node | Automatically calculated based on system memory, defaulting to 50% of the system memory. | As needed | Save changes without immediate execution; modifications take effect after service restart. |
General Configuration
Set the following parameters in conf/iotdb-system.properties. Refer to conf/iotdb-system.properties.template for a complete list.
Cluster-Level Parameters:
| Parameter | Description | Default | Recommended | Notes |
|---|---|---|---|---|
| cluster_name | Name of the cluster | defaultCluster | Customizable | Support hot loading, but it is not recommended to change the cluster name by manually modifying the configuration file |
| schema_replication_factor | Number of metadata replicas | 1 | 1 | In standalone mode, set this to 1. This value cannot be modified after the first startup. |
| data_replication_factor | Number of data replicas | 1 | 1 | In standalone mode, set this to 1. This value cannot be modified after the first startup. |
ConfigNode Parameters:
| Parameter | Description | Default | Recommended | Notes |
|---|---|---|---|---|
| cn_internal_address | Address used for internal communication within the cluster | 127.0.0.1 | Server's IPv4 address or hostname. Use hostname to avoid issues when the IP changes. | This parameter cannot be modified after the first startup. |
| cn_internal_port | Port used for internal communication within the cluster | 10710 | 10710 | This parameter cannot be modified after the first startup. |
| cn_consensus_port | Port used for consensus protocol communication among ConfigNode replicas | 10720 | 10720 | This parameter cannot be modified after the first startup. |
| cn_seed_config_node | Address of the ConfigNode for registering and joining the cluster. (e.g.,cn_internal_address:cn_internal_port) | 127.0.0.1:10710 | Use cn_internal_address:cn_internal_port | This parameter cannot be modified after the first startup. |
DataNode Parameters:
| Parameter | Description | Default | Recommended | Notes |
|---|---|---|---|---|
| dn_rpc_address | Address for the client RPC service | 127.0.0.1 | By default, the local machine can directly access it. For non-local access, please modify this configuration item to the IPv4 address or hostname of the server where it is located. It is recommended to use the IPv4 address of the server where it is located. | Effective after restarting the service. |
| dn_rpc_port | Port for the client RPC service | 6667 | 6667 | Effective after restarting the service. |
| dn_internal_address | Address used for internal communication within the cluster | 127.0.0.1 | Server's IPv4 address or hostname. Use hostname to avoid issues when the IP changes. | This parameter cannot be modified after the first startup. |
| dn_internal_port | Port used for internal communication within the cluster | 10730 | 10730 | This parameter cannot be modified after the first startup. |
| dn_mpp_data_exchange_port | Port used for receiving data streams | 10740 | 10740 | This parameter cannot be modified after the first startup. |
| dn_data_region_consensus_port | Port used for data replica consensus protocol communication | 10750 | 10750 | This parameter cannot be modified after the first startup. |
| dn_schema_region_consensus_port | Port used for metadata replica consensus protocol communication | 10760 | 10760 | This parameter cannot be modified after the first startup. |
| dn_seed_config_node | Address of the ConfigNode for registering and joining the cluster. (e.g.,cn_internal_address:cn_internal_port) | 127.0.0.1:10710 | Use cn_internal_address:cn_internal_port | This parameter cannot be modified after the first startup. |
2.4 Start ConfigNode
Navigate to the sbin directory and start ConfigNode:
# Unix/OS X
./sbin/start-confignode.sh -d   # The "-d" flag starts the process in the background.

# Windows
# Before version V2.0.4.x
.\sbin\start-confignode.bat

# V2.0.4.x and later versions
.\sbin\windows\start-confignode.bat
If the startup fails, refer to the [Common Problem](#Common Problem) section below for troubleshooting.
2.5 Start DataNode
Navigate to the sbin directory of IoTDB and start the DataNode:
# Unix/OS X
./sbin/start-datanode.sh -d    # The "-d" flag starts the process in the background.

# Windows
# Before version V2.0.4.x
.\sbin\start-datanode.bat

# V2.0.4.x and later versions
.\sbin\windows\start-datanode.bat
2.6 Activate Database
Option 1: Command-Based Activation
- Enter the IoTDB CLI.
The Linux and MacOS system startup commands are as follows:
# Before version V2.0.6.x
Shell > bash sbin/start-cli.sh -h 127.0.0.1 -p 6667 -u root -pw root

# V2.0.6.x and later versions
Shell > bash sbin/start-cli.sh -h 127.0.0.1 -p 6667 -u root -pw TimechoDB@2021
The Windows system startup commands are as follows:
# Before version V2.0.4.x
Shell > sbin\start-cli.bat -h 127.0.0.1 -p 6667 -u root -pw root

# V2.0.4.x and later versions, before version V2.0.6.x
Shell > sbin\windows\start-cli.bat -h 127.0.0.1 -p 6667 -u root -pw root

# V2.0.6.x and later versions
Shell > sbin\windows\start-cli.bat -h 127.0.0.1 -p 6667 -u root -pw TimechoDB@2021- Execute the following command to obtain the machine code required for activation:
show system info+--------------------------------------------------------------+
| SystemInfo|
+--------------------------------------------------------------+
| 01-TE5NLES4-UDDWCMYE|
+--------------------------------------------------------------+
Total line number = 1- Execute the following statement to obtain the version number of the database to be activated:
IoTDB> show version+-------+---------+
|Version|BuildInfo|
+-------+---------+
|2.0.9.2| 5ea21bc|
+-------+---------+
Total line number = 1Provide the obtained machine code and version number to the Timecho team.
Enter the activation codes provided by the Timecho team in the CLI in sequence using the following format. Wrap the activation code in single quotes ('):
IoTDB> activate '01-D4EYQGPZ-EAUJJODW-NUKRDR6F-TUQS3B75-EDZFLK3A-6BOKJFFZ-ALDHOMN7-NB2E4BHI-7ZKGFVK6-GCIFXA4T-UG3XJTTD-SHJV6F2P-Q27B4OMJ-R47ZDIM3-UUASUXG2-OQXGVZCO-MMYKICZU-TWFQYYAO-ZOAGOKJA-NYHQTA5U-EWAR4EP5-MRC6R2CI-PKUTKRCT-7UDGRH3F-7BYV4P5D-6KKIA==='Option 2: File-Based Activation
- After starting the Confignode and Datanode nodes, enter the
activationfolder and send thesystem_infofile to the Timecho team. - Receive the
licensefile returned by the staff. - Place the
licensefile into theactivationfolder of the corresponding node.
2.7 Verify Activation
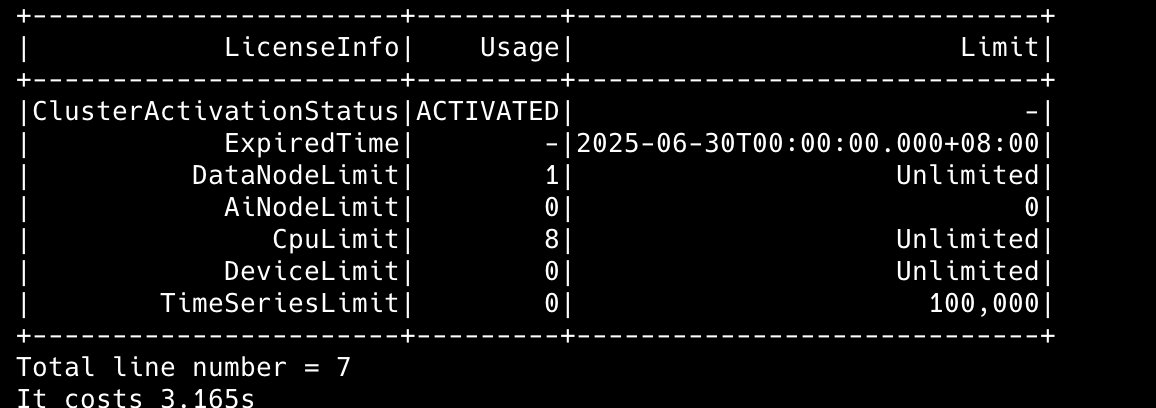
In the CLI, you can check the activation status by running the show activation command. Check the ClusterActivationStatus field. If it shows ACTIVATED, the database has been successfully activated.
3. Common Problem
- Activation Fails Repeatedly
- Use the
ls -alcommand to verify that the ownership of the installation directory matches the current user. - Check the ownership of all files in the
./activationdirectory to ensure they belong to the current user.
- Use the
- ConfigNode Fails to Start
Review the startup logs to check if any parameters, which cannot be modified after the first startup, were changed.
Check the logs for any other errors. If unresolved, contact technical support for assistance.
If the deployment is fresh or data can be discarded, clean the environment and redeploy using the following steps:
Clean the environment:
a. Stop all ConfigNode and DataNode processes.
# 1. Stop ConfigNode and DataNode services
# Unix/OS X
sbin/stop-standalone.sh

# Windows
# Before V2.0.4.x
sbin\stop-standalone.bat

# V2.0.4.x and later
sbin\windows\stop-standalone.bat

# 2. Check whether there are any remaining processes
jps
# Or
ps -ef|grep iotdb

# 3. If processes remain, kill them manually
kill -9 <pid>
# If there is only one iotdb instance on the machine, use the following command to clean up residual processes
ps -ef|grep iotdb|grep -v grep|tr -s '  ' ' ' |cut -d ' ' -f2|xargs kill -9
b. Delete the
dataandlogsdirectories.Note: Deleting the
datadirectory is required. Deleting thelogsdirectory keeps logs clean but is not required.cd /data/iotdb rm -rf data logs
4. Appendix
4.1 ConfigNode Parameters
| Parameter | Description | Is it required |
|---|---|---|
| -d | Starts the process in daemon mode (runs in the background). | No |
4.2 DataNode Parameters
| Parameter | Description | Required |
|---|---|---|
| -v | Displays version information. | No |
| -f | Runs the script in the foreground without backgrounding it. | No |
| -d | Starts the process in daemon mode (runs in the background). | No |
| -p | Specifies a file to store the process ID for process management. | No |
| -c | Specifies the path to the configuration folder; the script loads configuration files from this location. | No |
| -g | Prints detailed garbage collection (GC) information. | No |
| -H | Specifies the path for the Java heap dump file, used during JVM memory overflow. | No |
| -E | Specifies the file for JVM error logs. | No |
| -D | Defines system properties in the format key=value. | No |
| -X | Passes -XX options directly to the JVM. | No |
| -h | Displays the help instructions. | No |